Holtey Classic Hand Planes

No.986 Smoother - Now complete.
The No.986 is now complete and all pre ordered planes have been shipped.Work on the No.986 smoothing plane has been ongoing for more than 18 months, during which time I have explored many variants, and spent much time at the drawing board.
The No.986 is the latest addition to my 98 series of planes. With the introduction of the No.98 I brought some novel ideas to modern plane making, and looking through the 98 series you can trace the development and refinement of these ideas, leading directly to the new No.986.
Below is a brief summary of the journey...
The No.98
It is now 27 years since I began designing my own planes with the introduction of the No.98, although the desire to move away from wood infill and dovetails had been with me for some time by then.Each new plane in the 98 series has incorporated new ideas and improvements, and I also feel that every plane I make is better than the last simply due to the accumulation of hand crafting experience. The range of planes in the 98 series expanded over the years from a 14.5" No.98 Panel plane to the small No.983 Block plane.
Infill Planes
In the 1990's I moved from restoring antique hand planes for collectors to building my own versions of these classics, mainly Norris and Spiers patterns. These planes were not reproductions - I always gave myself license to adapt the old patterns to suit hand production in a modern tool shop. My versions of the A1 Jointer and the A13 Smoother were particularly well received by woodworkers and collectors, and by 1998 I had 12 planes in my portfolio, from the A1 Jointer through to the popular A31 Thumb plane.In 1998 I was asked to exhibit at the Exempla 98 show in Munich, and one of the planes I took with me was a mitre plane with a bevel up A2 blade. This proved to be a sensation with visitors - able to take the finest shavings from some very difficult knot filled boards.


Design Aims
It would use similar geometry to the Mitre plane - bevel up, 22.5-degree bed angle and with the blade honed to 30 degrees. However, the No.98 would be a 9.5" low angle Smoother with a Norris style adjuster.
One of my main design goals was the removal of wood as a structural element. Although a nice piece of rosewood can look very pretty when used as infill, I had for some time wanted to move towards using wood decoratively rather than structurally.
I decided to use wood for just the handles of the No.98 and I spent considerable time on their design. When you pick up a No.98 it feels comfortable in your hands, and this combined with the low centre of gravity make the plane a joy to use.
The handles contain metal bushings and in the No.98 are attached to the sole using fixings which give the impression they are floating above the base. This gives the plane a very modern and pleasing aesthetic. Later designs use a tenon fixing for the rear handle which lends a more solid appearance.
Another goal with the No.98 was a move away from using dovetails to join the sides and sole.
The peining of compound metal dovetails induces stress into the metal , causing the base of the plane to bow. I devised a fixing method using integral rivets - pins cut from the base of the plane using the mill (see picture). Riveting creates a stronger, better seated joint, and because stress from the riveting process is orthogonal, there is no tendency for the metal to bow or bend.
.jpg "No.986 Riveting.")


The 98 Series
When the No.98 was launched it was a great success with woodworkers and collectors, and received good reviews in magazines. A series of new planes of various sizes followed, a second smoother with the No.982, and then a block plane (No.983), followed by a panel plane (No.984). The No.985 was another smoother but this time without an adjuster.All the planes in the 98 series adhere to the design principles I pioneered with the No.98. My aim is to make the finest planes possible with the tools at my disposal, and each plane I make is a combination of hand craft and precision engineering.


The new No.986
The new No.986 smoothing plane is now complete.This is a 10.5" bevel up low angle smoother with all stainless-steel construction. The stainless steel is 1.4034 or AISI 420.
The blade is 2 1/4" x 3/16", bedded at an angle of 22.5 degrees and is made from A2 steel, which has been treated to my own specifications (including cryogenics).
With the No.986 I have returned to integral riveting for the body construction, as used on the No.98, No.983 and No.984 planes, and outlined above.
The lever cap is made from stainless steel and incorporates a circular recess across its width (see picture above). This engages with the bridge to ensure an evenly distributed clamping force between the sides. The lever cap is held captive by the bridge until the final three rotations of the thumbscrew.
The rear handle is tenoned on the underside, and this fits into a corresponding milled section in the base. The handles are bushed with a stainless-steel threaded spine and all handle contours are hand finished.
The adjuster is Norris style and fits into a machined recess in the sole and requires no fixings.
A few planes are still available for imediate delivery, please contact me if you are interested. The price is £8830.00 (+ VAT in the UK).

pa.jpg "No.986 Final Layout.")
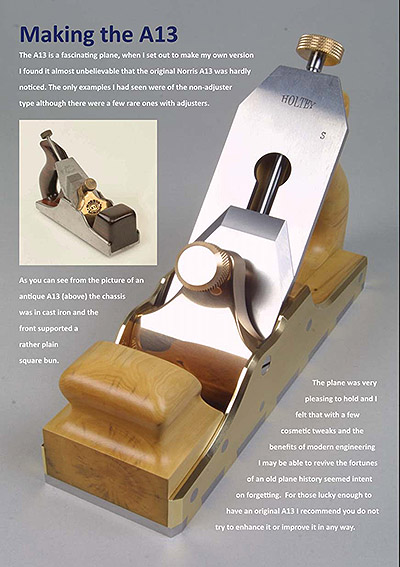
Making the A13
Many people who read my blog and visit my instagram and facebook pages enjoy the workshop pictures I post there showing my work in progress.
Some time ago we collected pictures of my last A13 build and published them together under the heading 'Making the A13'.
Although this was never intended to be an exhaustive documentary of a plane build, it does go some way to illustrate the variety of processes and number of hours which
I put into making a plane.
I also tried to show some of the unseen work which goes into my builds, such as the custom tooling, work holding jigs, setting up for milling or
lathe work and of course all the handwork such as filing and sanding.
This article has now been made into a PDF document which you can view on the planes / in depth / making the A13 page.
It is best viewed on larger screens as it is A4 page size and runs to 50 pages in total.